Getting Started - BigScreen
BigScreenConfig
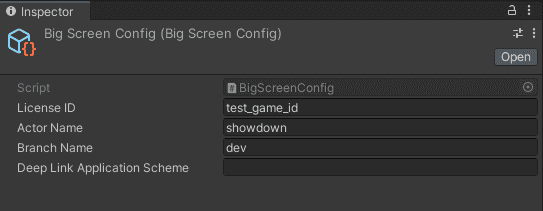
BigScreenConfig asset contains configuration that will be used when running as stand alone application. Only one config file is required per project. It can be created by right-click in Project panel Create/STREAMSIX/BigScreenConfig.

License IDis ID of this game. It needs to match with config in Actor and Client.Actor Nameis used to load the actor when BigScreen starts a session. This need to match with value in Actor's config.Branch Namedefines the RMB/Actor builds to use in the cloud.Deep Link Application Schemeis the prefix for linking back to this application. This is used for login through external browser.
BigScreenManager
BigScreenManager component is the main class to access STREAMSIX features for BIgScreen. The BigScreenConfig is attached to this component.

Add BigScreenManager to the scene and call Init(), which handles setting up environment and loading the cached or guest user.
Init() is async function. Once it returns, you can start using BigScreenManager, register to it's various callbacks, starting a session, etc.
Debugger
Open the debugger window from dropdown menu: STREAMSIX/Debugger.
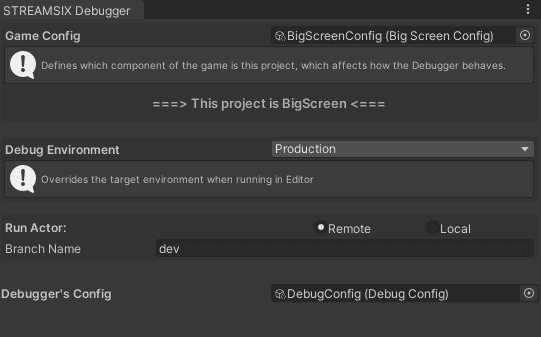
The same BigScreenConfig is also attached in Debugger, which can override some configs when running in Editor.
Run Actor in Remote

Debugger overrides the configuration in BigScreenConfig.
Developers can specify different RMB and Actor versions in Debugger. This takes effect in Play Mode and never in stand alone build.
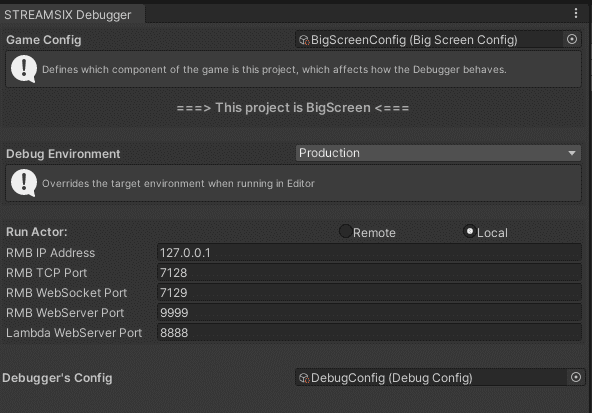
Run Actor In Local

Debugger can instruct BigScreen to connect to a local actor (ie. your actor's Unity project). Here the configuration is IP/Port that the actor will be using.
Ensure these values match the values in Actor's Debugger.
Remote Debugging
Currently only supports debugging basic-rmb and go-actors
Remote debugging of either basic-rmb, or go-actors can be enabled by running CreateSession or CreateSessionAsync with the debug: true named parameter like so:
await mManager.CreateSessionAsync(maxPlayer, debug: true);
This will start basic-rmb, or your go-actor through Delve, which will allow you to use most editors to attach into a debugging session.
The IP of the rmb to use to attach will be printed to your logs once it is able to connect, and the debugging port for delve will always be fixed at 4040.
Note1: If you are debugging a custom go-actor, then the branch/tag that you specify must point to a binary that was compiled with the flag -gcflags='all=-N -l'.
Note2: If you are debugging the basic-rmb-1.4.0-6+, then using the debug: true named parameter will automatically select a binary compiled with the above flags. Using versions older than basic-rmb-1.4.0-6 will only run binaries without the flags, giving you limited capabilities in the debugger
Note3: Debug RMB's are not pooled and are provisioned on a as-needed basis. As such, you may end up waiting anywhere from 30 seconds - 1 minute more on startup times.